


Types of Trolley Diagnostics
A trolley diagnostic tool (also known as an automotive diagnostic tool) is designed to identify and analyze the functionality of various car components. These sophisticated devices help mechanics and car owners troubleshoot vehicle issues quickly and efficiently. Below are the main categories based on technology and diagnostic capability:
Standard Trolley Diagnostics
The most common variety in the market with fundamental capabilities allowing mechanics to:
- Read and clear basic trouble codes
- Perform simple system checks
- Monitor basic vehicle parameters
Best for: Basic diagnostics and routine maintenance tasks
Professional Trolley Diagnostics
More advanced than standard versions, offering enhanced capabilities:
- Access multiple control units
- Perform active tests and component activation
- Provide detailed live data and graphing
Best for: Professional mechanics requiring in-depth diagnostics
Dealer-Specific Trolley Diagnostics
Manufacturer-developed tools designed for specific vehicle models:
- Complete compatibility with brand-specific systems
- In-depth diagnostics of proprietary systems
- Advanced programming of control modules
Best for: Dealerships and specialized repair shops
Expert Tip: When selecting a diagnostic tool, consider not only your current needs but also future requirements. The automotive industry evolves rapidly, and investing in a tool with update capabilities can provide better long-term value.
| Type | Key Features | Ideal Users | Price Range |
|---|---|---|---|
| Multibrand Trolley Diagnostics | Compatible with multiple vehicle manufacturers, wide range of diagnostic functions | Independent repair shops, mechanics working on various vehicles | $$$ |
| Bluetooth Trolley Diagnostics | Wireless connection to smartphones/tablets, remote data analysis, software updates | Mobile mechanics, tech-savvy users preferring app interfaces | $$ |
| OBD-II Scanner Trolley Diagnostics | Portable, plug-in capability to OBD-II port, basic code reading/clearing | DIY enthusiasts, basic car owners, entry-level technicians | $ |
| Advanced Diagnostic Trolley Diagnostics | Combined diagnostic and programming capabilities, coding/configuration for control modules | Professional technicians, specialized repair shops | $$$$ |
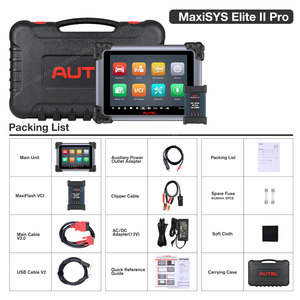
Specifications & Technical Details
The specifications of trolley diagnostics vary significantly depending on the manufacturer, model, and intended use case. Understanding these technical details can help you select the right tool for your specific needs.
Hardware Specifications
- Display: LED/LCD screens ranging from 10-20 inches
- Processor: Typically quad-core or higher (Intel or ARM)
- Memory: 2GB-8GB RAM with 128GB-512GB storage (HDD/SSD)
- Battery Life: 4-12 hours on a single charge
- Dimensions: Approximately 30cm × 20cm × 10cm
- Weight: 1kg-5kg for portability
Software & Connectivity
- Operating Systems: Windows, Linux, or Android
- Connectivity: Bluetooth, USB, Ethernet, and Wi-Fi
- Update Frequency: Monthly to quarterly updates
- Vehicle Coverage: Varies by model (domestic, European, Asian)
- Language Support: Multiple languages for global markets
- Data Formats: Compatible with industry-standard protocols
Relative Processing Power by Diagnostic Type
Important Note: Always verify that the diagnostic tool's specifications meet the requirements for the specific vehicles you'll be servicing. Incompatibility issues can limit functionality and waste resources.
Maintenance Best Practices
Proper maintenance of trolley diagnostic tools ensures their longevity, accuracy, and reliable performance. Implementing these practices will protect your investment and maintain diagnostic precision.
| Maintenance Task | Frequency | Benefits | Special Instructions |
|---|---|---|---|
| Regular Cleaning | Weekly | Prevents dust accumulation and potential damage | Use microfiber cloths and approved electronic cleaners |
| Equipment Inspection | Monthly | Identifies early signs of wear or damage | Check for loose components, screen damage, port integrity |
| Battery Maintenance | As needed | Ensures reliable operation during diagnostics | Avoid complete discharge; store at 40-80% charge |
| Software Updates | As released | Provides latest vehicle coverage and features | Connect to secure network; backup data before updating |
| Proper Storage | After each use | Protects from environmental damage | Store in dry location between 50-85°F (10-30°C) |
| Cable/Connector Maintenance | Monthly | Prevents connectivity issues and data errors | Inspect for bent pins; clean with contact cleaner |
Professional Insight: Create a maintenance schedule and assign responsibility to specific team members. Regular maintenance checks prevent costly downtime and ensure diagnostic accuracy when you need it most.
How to Choose the Right Trolley Diagnostic
Selecting the most suitable trolley diagnostic tool requires careful consideration of several factors. The right choice will enhance your service capabilities, improve efficiency, and provide better value for your investment.
Vehicle Coverage Considerations
Assess the range of vehicles your business services:
- Modern tools cover wider ranges including older models
- Specialized vehicles may require specialized diagnostics
- Consider domestic vs. import vehicle capabilities
- Verify coverage for specific years, makes, and models
Key Question: What vehicle types form 80% of your business?
Functionality Requirements
Match diagnostic capabilities to your service offerings:
- Basic maintenance requires standard diagnostics
- Complex repairs need advanced capabilities
- Specialized services (e.g., hybrid/electric) need specific tools
- Programming capabilities for module replacement/updates
Key Question: What diagnostic tasks do you perform daily?
Budget Consideration: While initial cost is important, calculate the total cost of ownership including software updates, licensing fees, and technical support. Sometimes a more expensive tool with better long-term support provides superior value.
Additional Selection Factors
- User-Friendliness: Intuitive interfaces reduce training time and improve efficiency. Look for clear navigation, helpful tutorials, and user communities.
- Update and Support: Regular updates keep pace with new vehicle technologies. Consider the manufacturer's update frequency and support quality.
- Ergonomics and Portability: Physical design affects daily usability. Evaluate size, weight, screen visibility, and battery life for your workspace.
- Specialized Equipment Compatibility: Some diagnostics require additional equipment like oscilloscopes or adapters. Ensure compatibility with existing tools.
Key Selection Criteria Importance
DIY Replacement & Troubleshooting Guide
For those with technical aptitude, replacing or troubleshooting trolley diagnostic components can be a cost-effective approach. Follow this systematic process to ensure safe and successful repairs.
Essential Tools & Preparation
Required Tools
- Workshop manual (mandatory reference)
- Screwdriver set (Phillips, flathead, Torx)
- Pliers and wrench set
- Multimeter for electrical testing
- Soldering iron and electrical tape
- Diagnostic software and laptop
Safety Precautions
- Disconnect power before servicing
- Work in a clean, well-lit environment
- Use anti-static measures for electronics
- Document all connections before disassembly
- Keep small parts organized in labeled containers
Step-by-Step Replacement Process
-
Identify the Issue
Consult the workshop manual and use diagnostic tools to pinpoint the exact problem. Connect to the OBD-II port and read any diagnostic trouble codes (DTCs) to understand what's malfunctioning.
-
Prepare for Disassembly
Take photos of the current assembly for reference. Label all connections and parts in their original positions to ensure proper reassembly later.
-
Careful Dismantling
Follow the workshop manual's disassembly sequence. Use appropriate tools to remove screws, bolts, or clips securing the component. Work methodically to avoid damaging surrounding parts.
-
Component Inspection and Replacement
Compare the old component with the new one to verify compatibility. Check for any physical damage or signs of electrical failure. Install the new component according to the manual's specifications.
-
Reassembly and Testing
Reconnect all electrical connectors and mechanical elements. Secure all fasteners to the recommended torque. Clear any stored DTCs using the diagnostic tool and perform a comprehensive test to verify the repair.
DIY Success Tip: If you encounter unexpected challenges during the repair process, don't force components together. Consult online forums or professional resources for guidance. Sometimes a step-back approach can prevent further damage and save time in the long run.
Warranty Warning: DIY repairs may void manufacturer warranties on diagnostic equipment. Always check warranty terms before attempting self-repairs on equipment still covered by warranty protection.
Frequently Asked Questions
Q1: Can a trolley diagnostic tool be used on all vehicles?
Each vehicle has a unique operating system. While some trolley diagnostic tools are designed with universal compatibility, others are manufactured for specific vehicle types or brands. Always verify compatibility before purchasing or using a diagnostic tool on a particular vehicle. Professional-grade and dealer-specific diagnostics typically offer the broadest coverage but at a higher price point.
Q2: Are trolley diagnostic tools user-friendly?
Modern trolley diagnostic tools are generally designed with user-friendliness in mind. Most feature intuitive interfaces with touchscreens, clear navigation menus, and multiple language options. However, the learning curve varies depending on the tool's complexity and the user's technical background. Basic code readers are straightforward to use, while advanced diagnostic systems may require training to utilize their full capabilities effectively.
Q3: Can a vehicle's diagnostic port be used to update the software on a trolley diagnostic tool?
In most cases, vehicle diagnostic ports (OBD-II) are not designed for updating diagnostic tool software. Trolley diagnostic tools typically require updates through separate channels such as:
- Direct computer connection (USB, Ethernet)
- Wi-Fi or cellular network connection
- Specialized update interfaces provided by the manufacturer
- Memory card updates
Always consult your specific tool's documentation for the proper update procedure to avoid potential damage or functionality issues.
Q4: How often should diagnostic tool software be updated?
For optimal performance and comprehensive vehicle coverage, update your diagnostic tool software whenever the manufacturer releases new versions. Most professional tools require updates quarterly or monthly, while basic tools may have less frequent update schedules. Regular updates ensure compatibility with new vehicle models, provide access to the latest diagnostic procedures, and fix any software bugs.
Q5: What's the difference between OBD-I and OBD-II diagnostic tools?
OBD-I (On-Board Diagnostics I) was the first-generation diagnostic system used in vehicles manufactured before 1996. OBD-II is the standardized system implemented in all vehicles sold in the US since 1996. The key differences include:
| Feature | OBD-I | OBD-II |
|---|---|---|
| Standardization | Manufacturer-specific | Universally standardized |
| Connector | Varies by manufacturer | Standard 16-pin connector |
| Diagnostic Capabilities | Basic engine diagnostics | Comprehensive vehicle system monitoring |
| Code Format | Proprietary | Standardized trouble codes |
Most modern diagnostic tools support OBD-II, while specialized adapters are required for OBD-I vehicle diagnostics.


 浙公网安备 33010002000092号
 浙B2-20120091-4